
What to include in your Audio Post Transfer

Please note: “Sync Sound” must be completed by your asset manager or video editor during the media dump and cataloguing stage.

Any project failing to do so, will incure additional charges. This needs to be discussed and addressed in advance due to severe impact on delivery times.

Prepare the following

  • Movie file with sound and timecode
    • Format: Quicktime H.264 / MP4, at 720p or 1080p)
    • Sound embedded for guide track.
    • Timecode Embedded/Burnt In for reference.
  • AAF (Preferred) or OMF Transfer:
    • A Folder containing the AAF/OMF with supporting audio files
    • Zipped for transfer and archiving
  • Production Sound Files:
    • Folders named by scene of all recorded dialogue, room tones and on-set foley.
    • Folder with music.
    • Folder with sound effects.

How2: Add Timecode To Your Video

Timecode

and why its important

In the world of video editing, adding timecode during post-production is like giving your project a precise roadmap. Timecode is a digital timestamp that helps sync audio and video elements with incredible accuracy. This is crucial for scenes with multiple cameras or complex visual effects.

Having timecode isn’t just about accuracy; it’s a collaboration tool. Different members of the post-production team can easily work together when everything is synchronized to the same time frame. This not only speeds up the process but also minimizes errors.

In audio post-production, timecode ensures that sound elements align perfectly with the visuals. Dialogue, music, and sound effects hit the right beats, creating a more immersive viewer experience.

In a nutshell, timecode in post-production is your silent conductor, ensuring that every element comes together seamlessly. It’s the key to turning creative vision into a polished and professional final product.

Adding Timecode with Adobe Premiere Pro
(Version 24.0.3 Build 2)

Step 1

Add Timecode Video Plugin

Inside the Effects section of Premiere Pro, search for the “Timecode” video plugin and drag this on to a sequence that contains your entire film.

Step 2

Check Timecode Visibility & Synchronisation

Check that the timecode displays on top of the video and is easily readable.

Scan through the timeline of your sequence and check that the timecode matches your project throughout.

If there are discrepancies, check step 3 below.

Step 3

Adjusting Timecode Settings

In the effects controls section:

  1. Adjust the timecode settings to match the specs of your project.
  2. Make sure the timecode source is set to media or sequence depending on how youve added it to your timeline. The readout should reflect the entire length of your film and not reset from cut to cut
  3. Make sure the timecode type is correct and that the frame rate is the same as your project

Adding Timecode with DaVinci Resolve
(Version 17.4.3)

Step 1

Select Data Burn-In from Workspace Menu

Click the workspace menu and select “Data Burn-In” to open the options for Timecode to be displayed on your project.

Step 2

Select Record Timecode

At the top of the window, make sure project is selected, not clip

Turn “Record Timecode” on to add timecode to your project.

This should show timecode synchronised with the entire project sequence.

Step 3

Check the timecode sync

Scan through the project to make sure your timecode is correct throughout.

How2: Prepare Your Film Project's Audio For Transfer To Audio Post & Sound Design

Post Production Audio Transfers

AAF, OMF, and which one to use.

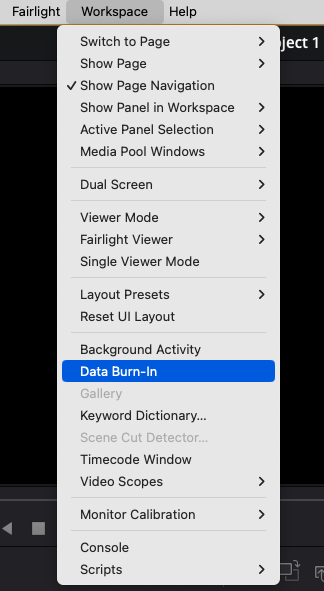
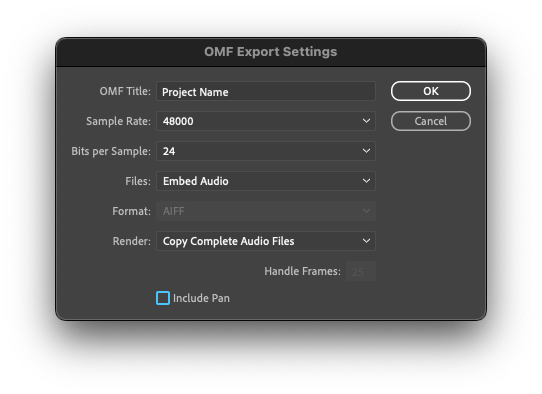
In audio post-production, AAF (Advanced Authoring Format) and OMF (Open Media Framework) transfers are like translation tools for sound. They allow seamless exchange of audio files between different software and systems.

AAF and OMF act as universal bridges, ensuring that sound projects can smoothly transition from one editing platform to another. This compatibility is crucial for collaborative workflows, where different professionals may use various software applications.

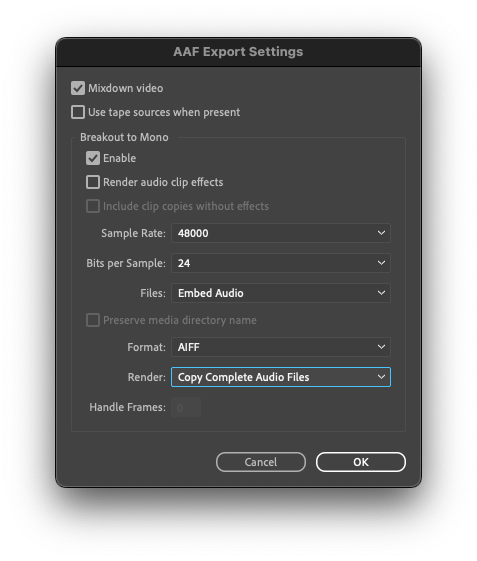
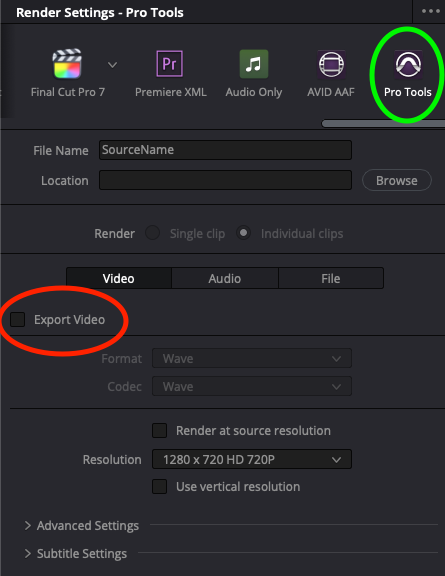
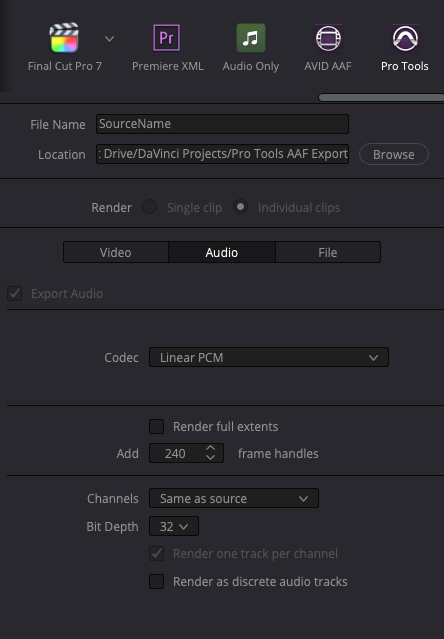
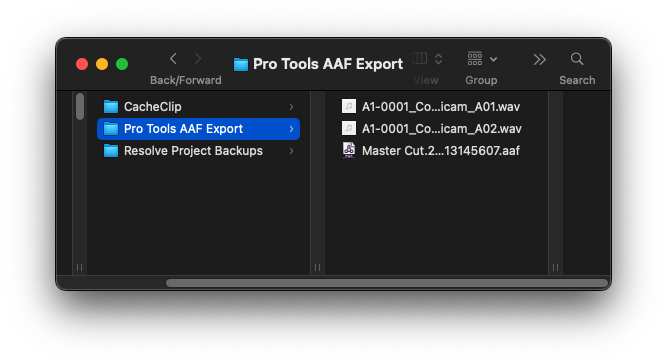
AAF is newer in its standards built on the legacy of OMF providing more information to be exchanged between production software.

Ultimately, AAF and OMF transfers simplify the intricate process of sharing and working on audio projects across different post-production environments.

It’s important to emphasise that OMF is an older format, and many modern DAWs (Digital Audio Workstations) have transitioned to using AAF or other file formats for better compatibility and more advanced features. Always check the specific documentation of your DAW and its version to confirm the level of OMF support. Additionally, industry standards and software capabilities evolve, so it’s a good idea to explore the latest updates and features of your chosen DAW.

Exporting your project from Adobe Premiere Pro
(Version 24.0.3 Build 2)

Step 1

Open the desired sequence

Open the sequence you wish to transfer.

This will only export the active sequence and all audio related to it.

Use the settings shown below

Exporting AAF (Preferred)

Use the settings shown

Exporting OMF

Use the settings shown

Exporting your project from DaVinci Resolve
(Version 17.4.3)

This needs to be an Audio Only AAF

DaVinci Resolve can export to Pro Tools and Avid by design.

However, DaVinci Resolve struggles with transfers to other Digital Audio Workstations and some settings need to be adjusted to make transfers work.

For transfers to Logic Pro users – before you start:

  • Backup/Save your project under another name
  • Select all audio and “Remove Attributes”

Step 1

Click Deliver Tab

Go to the Deliver Page shown at the bottom of your screen.

This will show you a range of outputs to various social media platforms and video formats.

It will also show you exports to Pro Tools & Avid.

Step 2

Set Video Settings

This is an Audio Only AAF Export

  • Create a new folder [Project name – AAF Export] and set location
  • Uncheck Export video in Video Tab
  • IMPORTANT: Do not re-click Pro Tools button (this resets changes and checks the video box)
  • Go straight to the audio tab

Please Note: Video must also be exported separately with sound as if you are preparing to upload online.

For video settings

    • Select Quicktime format, Codec H.264 for easy compatibility
    • Select resolution of HD 720p (more than enough for most audio engineers)
    • Quality automatic

Step 3

Set Audio Settings

For codec:

  • Protools & Logic – Linear PCM

Frame handles:

  • 240 frames = 10 seconds for 24fps video
  • 300 Frames = 10 seconds for 30fps video
  • 600 frames = …..i think you get it?!

Bit Depth:

  • If original audio was recorded in 32bit, keep it as 32bit depth, its becoming more common.
  • If original audio was recorded at 24bit, change to 24bit.

Step 4

Compress The Transfer

You should end up with a 1x folder containing a collection of “Audio Files” & 1x “AAF”

Zip/Compress This Folder and prep to transfer.

For Logic Pro Users

For transfers to Logic Pro users:

  1. Select all audio and “Remove Attributes”
  2. On the Deliver page choose Pro Tools
  3. Under the Video tab – uncheck “Export Video” (render this separately)
  4. Under the Audio tab
    1. Choose “Linear PCM” wave format
    2. Add handles of 240 frames (10 secs for 24fps) or more if possible.
    3. Choose the maximum bitdepth used in your project. 24bits is usually standard but your audio engineer may have recorded in 32bit.
    4. uncheck “use unique file names”
  5. Add to render queue

Get In Touch: elliot@chaoscreative.co.uk